I have long been obsessed with the idea of the Everyday Wardrobe - the idea of spending my making time on items I actually wear. Over on my Patreon, I have devoted no less than 16 entries to the art of thinking through what we wear, how we wear our clothes, and what we choose to wear, but today I’m back here on my blog to share my Everyday Wardrobe Journal with you. It’s a relatively new tool to me, but I’m so excited to show you my thought processes.
The aim of setting up an Everyday Wardrobe Journal? It’s to guide me through my making year: it’ll help me remember what I need in my wardrobe and what I definitely do not need. My making time is finite and I have decided to spend it more thoughtfully and mindfully.
Caveats before we get started:
I dress-make as well as knit, so I do include my dress-making in my journal. However, it’s easy to customise to just include your craft of choice (and also help you purchase the right shop-bought clothes instead of those pesky impulse purchases!).
I work as a knitwear designer, so I include my design plans in my journal. That means rather than you getting pattern names to possibly hunt down, you’ll see places in which I write OWN. It just means this is a pattern I need to design/work out.
This is the basic set-up. On the left, I have a page devoted to my colour palette and personal style (these things will be familiar to Patreons) and on the right I have a sort of “wish list” breakdown where I analyse what I want, what I need, and what I make. I’ll break down what these two pages mean today and next week I’ll show you how I organise the rest of the Everyday Wardrobe Journal.
This is my master page.
This page sets out what colours I usually wear, and also tries to explain my personal style in a way that’ll help me assess whether a project is right for me or not. It might look fun, but what’s the point of making something if I’ll never wear it?
Colours: I have divided my wardrobe into Neutrals, Contrasts, and Accents. Don’t worry too much about the Main/Secondary categories - I get a bit finickity about colours and not everybody is like me!
Neutrals: I have chosen navy and brown as my neutrals. These are the basic colours in my wardrobe that go with everything else and which I tend to use for most of my core clothes.
Other people’s examples might be greys, creams, tans, black, or even dark, dark green.
Contrasts: I have chosen mustard yellow and hot pink as my contrasts. They’re the everyday additions that I love adding to my outfits. I would have added teal too, except I have teal hair and it’d be a bit much to have teal-on-teal! I tend to use contrasts for my big makes such as shirts, sweaters and cardigans - though occasionally I’ll add some summer culottes to the mix (as you can see from the header photo).
Other people’s examples might be purples, blues, navy (one person’s neutral is another person’s contrast!), moss greens, wine reds, etc.
Accents: These are the pops of colours I add to an outfit. Earrings, bags, hats, mitts, belts etc. I have added teal and rust as my main accents. When I dress-make, I love fabric that’s either one of my neutrals or my contrasts but which also has one of my accent colours in the pattern.
Other people’s examples might be pink, neon, red, periwinkle etc. It all depends upon your personal style.
You can probably guess that I wear my Catterline sweater a lot!
Then we come to style which is harder to explain briefly. I have narrowed down my style preferences in a way that helps me understand what I should make: 1970s-meet-Bauhaus. It’s not super-accurate but it helps me. Having a shorthand style mantra makes it easy to decide I should not make a cute 1950s tea dress nor should I design a neon-coloured brioche sweater dress. My note on materials>ornamentation also reminds me that I care a lot about the materials I use and that I’m more inclined to wear something which showcases the materials rather than obscure them with sequins, ruffles, or textured yarn/fabric.
Trying to figure out your personal style and making style takes time, but it’s worth it as you’ll stop using your Making time on things you’ll never use!
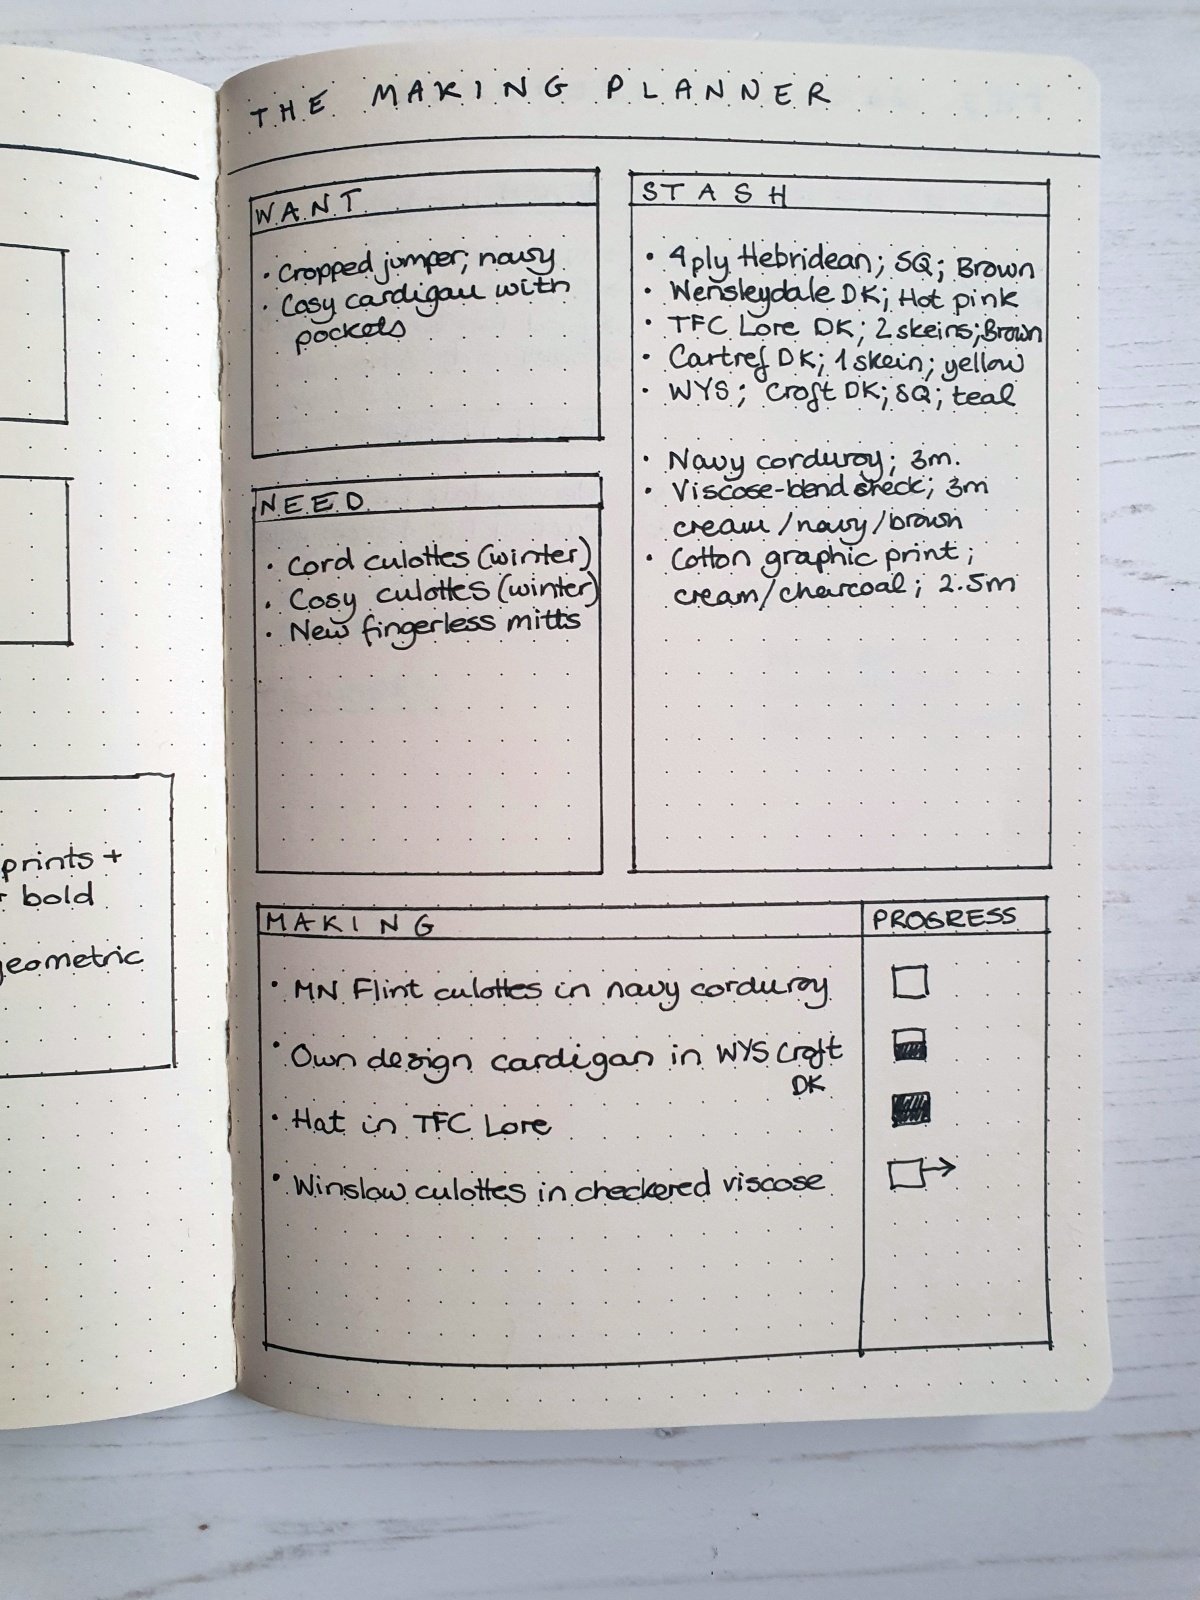
Now for the “wish list” page which is one that I use to figure out what I should be spending my time doing! You might think of it as a matrix.
I have three boxes: Want, Need, and Making - and then a fourth box that contains my current stash obsessions.
The things I want are not necessarily the things I need, and vice versa. You can see that I need two cosy trousers for the Scottish winter, but I want a cropped navy sweater. Those things are not the same, so some decisions need to be made. I also have my stash that reveals I do indeed have the perfect fabric for some navy cord culottes - so that project is moved into my Making box.
I constantly refer to the Want and Need boxes to figure out what should be next on my making list, and it’s especially helpful if I already have the materials in my stash. Rather than having one page of just Wants or Needs and my stash notes elsewhere, I can jump back and forth to balance my making plans.
Next week I’ll share more details from how I make the leap from Want, Need, Stash to the actual Making part, and I’ll share more spreads (including one of an actual project page).
Hope you found this interesting and maybe something that helps you in your own making journey!


