Some Thoughts on Size Inclusivity in Knitting

spacecowboy5.JPG

The knitting industry is finally talking size inclusivity. While some designers and magazines have long worked with a large range of sizing, it is unfortunately not rare to come across patterns that operate within a narrow small/medium/large perimeter. This looks to be about change. Companies and designers are now thinking about expanding their size ranges, so it will be possible to find patterns that go beyond a 50” bust. As both a designer and a plus-size person, I welcome this discussion and these changes.

And I have some tips for both designers who want to design size inclusive patterns. I also have some tips for plus-size knitters.

Hi, I’m Karie and I’m a knitwear designer. I used to be one of those knitters who’d spend days going through Ravelry project pages and social media before deciding to knit a garment. I have decades of experiences trying to navigate fit and sizing, thanks to my body never neatly fitting into any one size. In 2018 I wrote a blog post with tips on how to choose patterns when you are a full-busted person. I am also currently writing a series on the handmade everyday wardrobe over on Patreon.

First, some ground rules:

  • This is not a post about modifying patterns. There are tonnes of workshops, books and articles out there. Google is your friend.

  • This is not a post about how to make yourself look slimmer or whatever. I’m a big fan of making peace with our own bodies because our bodies are amazing & carry us through life.

  • I am not here for body-shaming, and any comments about ‘real bodies’ or ‘real women’ will be moderated. Seriously, don’t be a jerk.


Tips For Designers:

Learn how to grade properly

This may seem like an intuitive place to start, but I have seen far too many patterns skip this basic step.

Grading is when you calculate different pattern sizes. It is pure maths and, if you do it properly, it can be incredibly satisfying. When I grade I use anything from 9 to 13 different measurements across the upper body to figure out a size. This is basic stuff like bust size, arm length and waist size to shoulder width, cross-back width, elbow-to-wrist length. Getting the numbers to work is a lot of fun.

Many people like to start from bust size and grade from that point out in 2”/5 cm intervals. And many start from the smallest size and grade upwards. This is problematic as the larger sizes will then begin to not fit correctly. Arms do not miraculously begin to grow longer just because it’s a larger size. Necklines do not need to be super-wide just because someone has a 52” bust. Likewise, many upper arms appear to be too tight in larger sizes.

So, invest in learning how to grade properly. There are courses and books that will teach you, but also look at other designers’ patterns (including those written by plus-size designers as we tend to understand our own bodies)

Think about the wearability & functionality of the garment

Sure, a garment can look fabulous in photos but if it is difficult to wear, people will not want to invest time and money in making the design.

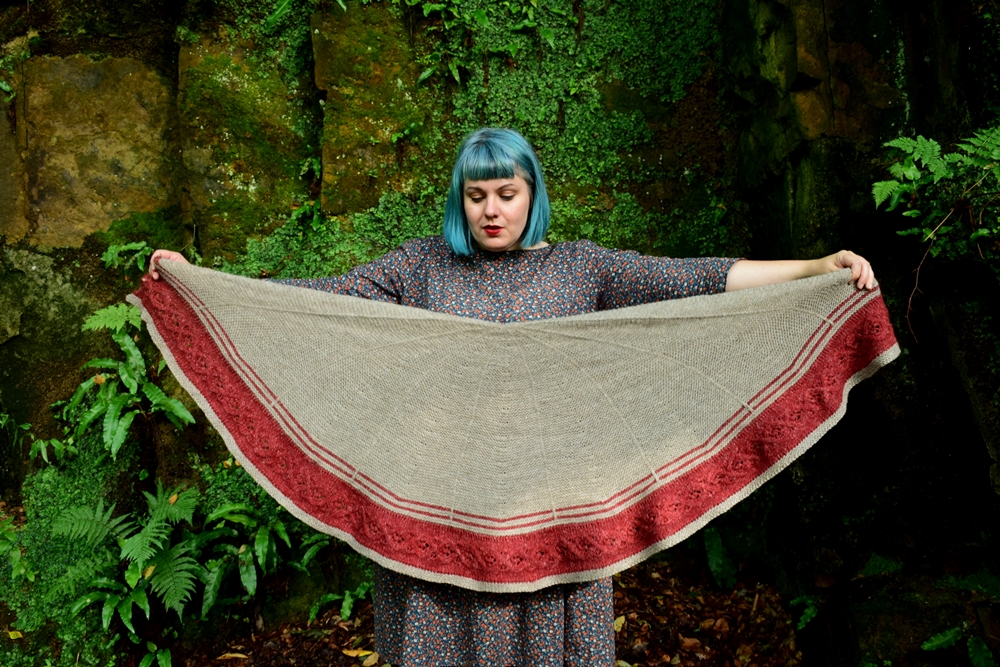
An example: the brown colourwork cardigan I am wearing in the photo above is one of the most beautiful pieces I have ever made, but I rarely wear it. The designer placed a 4-strand colourwork pattern right across the bust which makes it hard to breathe when I’m wearing the garment. The fabric is dense and inflexible right at the point when it needs to give the wearer most flexibility. The pattern has the same issue with the same 4-strand pattern right by the elbow/upper arm section which makes it difficult to use your arms. Arguably it is less of a problem at the lower end of the sizing range but once you get to L(!) and above, it present both a wearability and functionality problem.

Does your design have features that will only work for one end of the size range? Can you ensure basic functions just as being able to move and yes, I can breathe across all sizes? These are questions you need to think about before you begin to grade.

Aesthetics

Yes, I put aesthetics all the way down here because I’m not going to mess with your artistic vision.

However, think about the different sizes as canvases of differing sizes. You have more space on a larger canvas, so you may need to reconsider your artistic vision if it starts on a small canvas. Let me explain.

Imagine designing a cabled jumper. You have charted and swatched a gorgeous cable and your sweater is going to feature three of those cables going down the front. This looks incredibly beautiful in your chosen sample size (let’s call it the 30” size). Those three cables will look incredibly lonely and adrift on a sea of reverse stocking stitch in a 54” size. You need to reconsider your design. Maybe have 5 cables or 7 cables on the 54” size? How will that work with your neckline where you’ve artfully had those 3 original cable meet and then split?

In other words: If your artistic vision only works on small canvases, maybe reconsider that artistic vision.

Maybe also ask yourself why you start out by painting on small canvases and not a mid-size canvas? Or a large canvas? Can you change your artistic practice?

Pattern Writing

Technical writing is a topic close to my heart and one which needs to be part of the size inclusivisity discussion. It’s great if you have managed to design and grade a wearable pattern that runs over 24 sizes .. but can you write it? How can you make it easy for a knitter to follow a pattern which is that inclusive? How will you ensure that the numbers don’t all blur together and it becomes nigh impossible to follow your instructions?

(I’ll just drop in here and say that I teach pattern writing, but that’s another story)

Sit down and work out a strategy for how you will handle this. Will you separate the sizes out in categories or handle it visually by having a typographic hierarchy? Seek out designers who are used to offering a large range of sizes and analyse how they handle the glut of information. What works for you and what doesn’t work for you? Contact your technical editor and spend some money on talking it through with them. Please just don’t dump all your numbers into a word doc and call it a day. Part of the designer day job is knowing how to present complex information in a simple way.

Incunabula (4).JPG

Tips For Knitters

Understand Your Body

I don’t know about you, but I used to ignore my body a lot. I didn’t want anything to do with it. It was there, I filled it with biscuits, and I put some clothes on. Then I realised that my body is not an alien blob, it is not my enemy, and I have to understand my body if I am to make things that fit it well.

You are more than just your bust size.

Speaking from experience (and as someone who rarely sees her feet), it may seem that the bust dominates everything but it is simply not true. You are also your shoulder width, your waist line, your hips, the length of your torso, and the ratio of your arm length to your torso length. And that’s just scratching the surface! When I design garments, I take all those things into consideration instead of just zeroing in on my bosom and figuring out how to accommodate it.

Decide on a size based upon your top/high bust size, rather than your full bust measurement.

High street shops and independent pattern designers work with a large set of average measurements, and the measurements are typically graded to a B-cup. If you wear a larger cup size and you go for your full bust size when determining which size to knit, that’s when everything becomes too big. Take your top/high bust measurements, add roughly 2” (5cm) to that measurement and look for the size corresponding to that. That should give you an idea of which size you should knit. I am always so surprised when I do that because I always forget that my full bust skews my sizing.

So, take that step to understanding your body and how you shouldn’t decide upon a size just from one set of measurements. You’ll thank yourself.


Understand Your Body Shape

So, you are plus-size. That doesn’t mean you are just an alien blob (for years I felt I was one). Plus-size people come in all kinds of shapes. We are not all the same. Get naked and stand in front of a mirror. Where do you carry most of your weight? Stuff all the cutesy “pear”, “hourglass” etc names and just ask yourself: where do you carry most of your weight? Are you tall? Top-heavy? Wide shoulders? Big bum?

I have a good friend, Estelle, who looks super-amazing in her tunics. If I wore them, I’d look like a Victorian orphan. If I forced her to wear one of my cropped cardigans, she’d disown me. We are both plus-sized but we look very different.

So, own that amazing body of yours.

(You know, shaming women’s bodies is not only a big industry, but there are tonnes of people wanting to police what you should or should not wear (some of them very well-meaning and probably related to you), and you need to tune them out.

No matter what you wear, people will have opinions. The worst opinions you will hear might come from yourself, truth be told. When you hear yourself saying “oh no, I cannot wear that” ask yourself if what you are saying is the result of years of living in a world where bodies are politicised, shamed and sexualised, or if it is truly a reflection of what you see in the mirror.

If in doubt, head to your nearest high street store and locate a garment similar in shape and fit to the one you are thinking of making. A cropped oversized jumper? A fitted knitted dress with a scoop-top? Try that sucker on and see how it looks (and not how you think it looks). If your local high street shops don’t stock anything like that, find an online shop with easy returns. Or look in your friends’ wardrobe.

According to many well-meaning people, I should not wear cropped tops, drop shoulders or stripes. Guess what? One of my favourite tops is a cropped drop-shoulder striped top. I wear it and I feel good. And because I feel good in my top, people compliment me when I wear it.)


Modifications Are Great But ..

I am not going to talk about how to modify a garment but I’m going to touch upon why modifying a garment is a good skill set to have (and also less daunting than you think)

First of all: I believe strongly that it is within the designer’s remit to provide you with a pattern that should work for most people. I believe in a designer supplying an inclusive size range and giving notes on how to work basic modifications such as lengthening/shortening the body and/or sleeves. If a designer insists on giving you three sizes with no notes on how to make the garment fit you better, then don’t give them any money. Designers need to do better (and I say this as a designer myself).

Having said that, there will never be a pattern that magically fits every single body out there. And so you will probably need to look into modifications. This can be anything from adding more rows to make a sweater longer or making a buttonband deeper to accommodate a full-bust to adding short-row shaping or resizing sleeve caps. There are many tutorials out there and you can also take classes.

Learning how to modify a garment is a really empowering thing, honestly. It will teach you so much about your own body and you will definitely realise that you are not an alien blob. High street fashion teaches us all from a young age that our bodies are wrong in a myriad ways. Making your own well-fitting clothes is you taking back that power.

But if you start by choosing the right pattern and the right size, you are 99% of the way to making something you’ll treasure.

(Remember also that knitted fabric tends to be flexible and has a moderate amount of give. You may not need that short-row shaping despite all. I see many people adding short-row shaping no matter the garment and often that garment doesn’t need it. Even if you are a G-cup or at the very top end of the size range.)

DSC_0028.JPG

Phew. This ended up a lot longer than I anticipated. Come join the discussion either here or on IG. I want to hear from you and your experiences. Remember, as a maker you hold the power to change things. Whether you are a designer or a knitter, you can create things that challenge the status quo of a very rigid idea of what an acceptable body looks like. Let’s go.

The Knowth Shawl: Making & Marking Time

DSC_0430.JPG

I have just released the Knowth shawl as a single pattern on Ravelry, and wanted to take a moment to write about my thoughts behind it.

DSC_0419.JPG

The pattern was originally designed for Carol Feller’s Echoes of Heather & Stone collection, a book inspired by ancient Ireland. I read about early Irish history and archaeology, and that is when I learned about the carved calendar stone of Knowth. It captured my imagination and fuelled the design process.

Pre-historic stone carvings speak eloquently about the passage of time. Not only have they survived for millennia, but their making was a slow process. They were carved by careful hands using what we'd consider primitive tools.

I have always loved such carvings.

As a child I would let my fingers skim local rock art, imagining what it would be like to live several millennia ago. These days I know better than to touch ancient artefacts, but in my imagination I am still reaching out and touching the past. My makers' hands are no different to the stone carvers' hands. My tools and craft may be different, but I am as human as the person who carved an image into a rock so many years ago.

DSC_0399.JPG

The carved stone at Knowth captures the passage of time. It was carved approximately 5,000 years ago by patient hands; it is slightly weather-worn by millennia of sunshine, rain, and storms; and it was probably intended as a sun-dial. I like how this single carving contains both the brief moment of a day, the careful creative expression carried out over weeks or months, and the long stretch between then and now. Three expressions of time in one beautiful piece.

It became an obvious source of inspiration for a knitted shawl.

The Knowth shawl is less a straightforward interpretation of the stone – although its half-circle shape and strong geometric lines obviously lend themselves to knitwear design – but more a meditation upon what time and mark-making mean to a knitter. Garter stitch is easy to knit, but its meditative rhythm is interrupted by slipped stitches that stack to form etchings on top of the knitted fabric. An almost-hourglass-like cable also nods to marking time and its relative complexity asks that the knitter slow down.

Making things takes time and this is ancient knowledge.

DSC_0450.JPG

Writing Inclusive Knitting Patterns

20181122_103706.jpg

The knitting community has been talking inclusivity since the beginning of 2019. Not only is it a long overdue discussion of how to make everybody — and every body — welcome in the community, but it also shows no signs of slowing down. I want to write a bit about how pattern writers can be more thoughtful in their work , how to think about inclusivity on the page, and how to avoid pitfalls when putting together a knitting pattern. I have taught technical writing at university, I mentor budding designers, I run courses on pattern writing, and I have worked both as a technical and a copy editor in the knitting industry for close to ten years.

First, an overview of what this blog post is not going to do:

• It is not going to talk about design aspects such as size inclusivity.

• It is not going to address visual aspects such as pattern photos or social media images.

• I am not going to talk about knitting patterns and pattern writing from a knitter point-of-view — this is squarely aimed at people who write patterns and want to think about broader societal implication of their work.

Let’s go.

pleasing.jpg

The first rule of any technical writing is that you are not writing for yourself. This rule is usually used to highlight that we assume that everybody knows the same things as us. This leads to writers leaving out a lot of things assumed to be “common knowledge” and use shorthand instructions for things that might need to be explained in detail. A good example of this is something I came across the other day:

"If number of sts is not conducive to 2 x 2 ribbing +2, increase or decrease evenly across last row to get desired st count."

This was a free pattern on Ravelry promoted as a perfect beginner’s project, yet it is not written with a beginner in mind. This sort of knitting instruction is aimed at people who have a lot of knitting knowledge. There are no stitch counts, no mention of where to increase, and definitely no mention of which increase to use. Moreover, 2 x 2 ribbing is never explained anywhere in the text, and the phrase “ 2 x 2 ribbing + 2” is indecipherable unless you have worked several projects and feel confident working out your own stitch counts.

It’s pretty bad, in other words.

Any decent knitting pattern writer knows to think about their audience and tailor their writing for the perceived skill set of that particular audience. Knitting pattern writers need to think about skill levels as a baseline for any pattern they produce because, say it with me, we are not writing for ourselves.

Luckily there is a wealth of skill level guides out there: Vogue Knitting, KnittingGuru, SpruceCrafts etc that will help pattern writers figure out which skill level they are writing for and thus what kind of instructions they should be writing.

So, once we have established we are not writing for ourselves we should extend that thought to think about inclusivity.

"If number of sts is not conducive to 2 x 2 ribbing +2, increase or decrease evenly across last row to get desired st count."

There is something wrong here — apart from the lack of stitch counts, the lack of explanation of what “2 x 2 ribbing” means and so forth. Can you see what it is?

Using a word like conducive functions as a barrier. It is very formal and academic and it is a word that demands a very firm and specialised grasp of English. Conducive excludes people who are English language learners, people with a limited vocabulary (some teenagers, for instance), and people without a higher education. For some people, seeing a sociolinguistic prestige word such as conducive will be enough to provoke anxiety and an inability to continue with the project. It will make them feel inadequate and excluded.

If you want to promote inclusivity, make sure to use accessible language in your patterns. Think about how knitting patterns in English are used extensively by non-native speakers of English. How can you accommodate them?

Let us rewrite the example above (leaving out the fact that the pattern writer should have worked out stitch counts that work with the suggested rib):

If you do not get a stitch count that is divisible with 4 +2, increase or decrease evenly across the last row.

This is still not great. Let’s try again.

If you do not have a stitch count that works with 4 +2, adjust the number of stitches on the last row by increasing or decreasing evenly.

I still don’t like this, but we’ve avoided formal language. I’ve also used a direct form — “if you do not ..” — to lend a friendly air to instructions that are anything but friendly to the end user. (I would normally not use you in a pattern, but then again I would also provide stitch counts that work with a specified ribbing pattern!).

Your job as a pattern writer should be to ensure that the end user feels safe in your hands and relaxed that their project will turn out alright. Your language usage is part of that social contract.

August 2014 060.JPG

Cultural inclusivity. How can you make a knitting pattern feel more relevant to someone? Knitting is a global hobby, so write for a global audience.

A very easy thing would be to include both US and metric sizes and measurements in your instructions. Using a US size 6 needle? Make sure to specify it’s the same as a size 4mm. Does the yarn run 440 metres per skein? Make sure to include the 400 yds. Do you use words like “sport-weight” or “4-ply” — think about how different knitting cultures have different ways of thinking about yarn weights and help your end user make an informed decision.

Remember that clothes sizes differ from country to country. Europe has a size 40 that is roughly equivalent to a UK size 12, a US size 10, an Australian size 14, and a Japanese size 13. So, include as many measurements as you can in the pattern to help your end user select the right size.

In terms of yarn, give as many details as you can to help your end user select a suitable substitute if they live somewhere where your chosen yarn is unavailable or if they are economically unable to afford the yarn you have used. While the knitting world is global, the availability of yarn is still highly dependent upon where the end user lives. They should feel confident and happy using a different yarn to you.

Some notes on romance text and cultural assumptions:

  • Avoid value-loaded comments like “this hat would look best in cashmere or merino” — that has less to do with pattern instructions and more to do with wider societal pressure to regard certain fibres as “luxurious”. If you are recommending a particular fibre, make sure to explain why it is important from a technical point of view rather than a socio-economic one.

  • I’m not a fan of prescriptive phrases like “blue for a beautiful baby boy” or “pink for a princess girl” — to me, these phrases feel very exclusionary and limiting the appeal of a pattern. A more thoughtful text would read: “a beautiful baby blanket for the little treasure in your life”. This ensures the pattern caters to boys, girls, and parents who prefer a more gender-neutral option. Instead of limiting the pattern’s appeal, careful phrasing makes for a much wider audience. And, honestly, I don’t get the resistance to that.

  • Avoid loaded descriptors such as “skin-coloured” (whose skin colour?) and pattern names that are culturally insensitive (Irish Car Bomb is forever my golden standard of Woah, Don’t Do That ).

Again: you are not writing for yourself. Make sure you think beyond yourself and your circle of knitter friends.

There are other things to discuss: the different pattern writing conventions you find across the globe, socio-economic barriers such as the need for an iPad and WiFi to access tutorials (and the technical ability to work these tools), technical assumptions such as “work German short-rows here” and “join in the rnd to work Magic Loop”, and so forth.

My advice to you would be this: 1) you are not writing for yourself and 2) read as many different knitting patterns as you possibly can.

Knitting is a beautiful thing and it does not judge. Make sure your own pattern writing follows suit.

(PS. These days I am writing over on Patreon rather than blogging. Inclusivity in knitting patterns is just a discussion I felt needed to be thrown wider).

Shawl for an Art Lover

shawl4art1.JPG

Yesterday I released Shawl for an Art Lover, a pattern for the shawl I designed for my wedding.

I was always going to wear something knitted at my wedding and it was always going to be a shawl. I knew I wanted something big, beautiful and imbued with meaning. After I finished my book, this was the first design I started sketching.

Shawl for an Art Lover uses one of my favourite shawl constructions — the humble triangular shape — and the pattern motifs are inspired by the city in which I live: Glasgow, Scotland. The delicate lace takes its cue from the sinuous Art Nouveau lines of Charles Rennie Mackintosh’s iconic architecture, while the solid strip with its Estonian nupp and lace stitches calls back to the tenement tiles seen in the 19th century apartment blocks throughout Glasgow. The pattern is named after House for an Art Lover, a Glasgow house designed by Mackintosh himself and we photographed it at the Mackintosh Queen’s Cross Church, the head quarters for the CRM Society.

I fell in love in Glasgow and I also fell in love with Glasgow itself. The shawl reflects that.

shawl4art2.JPG

The shawl I knitted uses 5 balls of Rowan Kidsilk Haze, a silk/mohair yarn. I know it is a yarn that divides the waters but I chose it because I wanted a lightweight shawl that would keep me warm on a cold January day. KSH is magical that way - the fluff traps air and keeps you cosy even in the depth of winter. Many years ago I also used to work for Rowan and it was a nice way of embedding those memories into the shawl.

However, I’m going to give you some yarn substitution tips if you don’t feel like knitting a giant shawl in a yarn that is somewhat unforgiving if you make mistakes (or if it makes you sneeze).

  • Be mindful of yardage: you need around 1050m or 1150 yds to make Shawl for an Art Lover.

  • Even though Rowan Kidsilk Haze is marked as a laceweight, be careful substituting it with a true laceweight: the fluff adds a lot of ‘bulk’ which means it looks more solid than it actually is. If you substitute KSH with a true 2ply or even a cobweb, your shawl will look less ‘substantial’ and more delicate. You might like that effect, but if you are wanting something that looks more like the fabric I’ve created, you’ll be looking at a heavy laceweight to a 4ply. You know I’m going to tell you to swatch!

  • Think about the fibres: Silk and mohair make for a super-romantic combination, but if you are wanting something more practical or rustic, don’t be afraid to experiment. Alpaca is going to give you drape, Shetland will give you a crisp feel, Merino is going to be soft and wearable, pure silk will be fluid and drapey, and .. you know I am just going to swatch for you.

shawl4.jpg

The top swatch was done in a 1ply Shetland yarn which I have previously used for my Mahy shawl. It is a crunchy, oatmeal-type yarn and the stitch pattern comes out looking clean and well-defined. This sort of yarn has a lot of stitch definition and stitch memory, and it will remember its blocking for a long time whilst also softening a lot with use. It is not romantic nor top-end-restaurant elegant, but it is honest and wears well. For an everyday shawl, a Shetland-style yarn would be an excellent choice.

The bottom swatch was done in a new John Arbon sock yarn, the Exmoor Sock 4ply, a blend of Exmoor Horn, Bluefaced Leicester, Devon Zwartbles, and Falklands Corriedale. It’s a really interesting mix and one that I can see myself using for shawl designing. It has a handle of a standard merino/nylon sock yarn with with added lustre and drape. As you can see, you still get a nice stitch definition and the 4ply fills out the spaces between the stitches a bit more, giving the shawl a more solid, substantial feel. Using a 4ply sock yarn would make a practical and bold shawl.

The two swatches laid on top of the Kidsilk Haze sample should help you visualise the difference. See the crispness in the Shetland swatch? The solid feel of the sock yarn? Both look stunning and so different to the airy softness of the silk/mohair.

shawl4a.jpg
  • Nupps: a few people have told me that they are afraid of nupps. Please don’t worry! Their difficulty has been vastly exaggerated! Nupps are small bubbles made by knitting several times into the same stitch and then working all those extra stitches together. There are plenty of great tutorials out there and if you really, really hate nupps, you can always substitute them with beads. It’s absolutely allowed.

shawl4b

Finally a look at how the entire shawl looks like when not worn. It is .. rather large which makes it perfect for wrapping around you. The shawl is well-worn in this photo (sorry, I got married in it before we went for a photo shoot) and you can still see the drape and lovely halo here.

I wanted to make something that was beautiful, that felt beautiful as I was knitting it, and which made other people feel good too. I wanted to write a pattern that was enjoyable and allowed other people to imbue their own makes with their own meaning. I’ve already received comments from people who plan on knitting this for their own wedding. It is something you can knit for the special people in your life (including yourself! - never forget that) and wear for special occasions — but ultimately Shawl for an Art Lover is about letting beauty and love into your everyday life.

Because We Are Makers & Make Each Other Happy

David & Karina 047.JPG

I’ve had a busy January. Apart from the usual tax return fun and getting things in order after the holiday season, I’ve also had other things to preoccupy me. Like, getting married.

I found the whole wedding process incredibly not-fun and often frustrating. As someone who’s never dreamed of having a wedding, I was thrust into a world where I was supposed to have opinions on flowers, colour schemes, table plans, menu options, and cake flavours. Even more disturbing, I found myself in a world where brides were consistently depicted as young, slender, and blonde. It was assumed I’d diet to fit into a heavy, corseted dress and that I’d overdye my hair to a natural colour. Encountering the wedding industry was a reminder that I’m lucky to work in knitting: a community that has its fair share of problems (to say the least) but does not feel as patriarchal as the giant wedding industry.

So, here’s what we did instead.

I designed and knitted my own shawl using Rowan Kidsilk Haze. I used to work for Rowan years ago, and KSH is perfect for a soft, light and warm shawl. Exactly what I needed for a cold January day. I’ll write more about the shawl at a later date. I finished designing it last year and always intended to release it as a pattern before deciding it would make a beautiful wedding shawl for myself.

The dress is another story. I originally intended on making a dress for myself (too many frustrating visits to bridal salons), but after playing around with the toile and coming up against work deadlines, I decided to let a proper dressmaker have fun with it. I designed the dress itself and was inspired by Hedy Lamarr’s star dress, 1970s maxi dresses, and Gucci’s current maximalism (as exemplified beautifully by Lana Del Rey at the Grammys). I did have another plan at first, but I’m glad that I decided to go with my gut instinct.

I kept jewellery to a minimum wearing my grandmother’s necklace (with my late father-in-law’s ring tucked behind the flower pendant), bracelets gifted by a dear friend, long pearl earrings and a simple headband. I don’t tend to wear jewellery at all, so I felt that was a lot! The wedding rings were designed and made by my brother-in-law.

And, well, I married a Scotsman who obviously wore a kilt! David looked very handsome.

David & Karina 186.JPG

We had a low-key time with a small civil ceremony in front of our closest family and friends. It was important to me that the ceremony was as intimate and personal as possible — especially as I had found the whole planning process very intense and unpleasant. I remember the ceremony as being full of laughter and joy. We had written our own vows and had a close friend do a reading. David and I have been together for 13 years and it was just lovely to look back at our years together as well as look ahead at what is to come. As I said at one point: we do not complete each other, we complement each other.

One of the greatest joys of the day was welcoming friends to join us for the evening celebration. We were lucky enough to have friends join us from all over the world: Scotland, England, Denmark, Sweden, Bulgaria, The Netherlands, Turkey, Canada, and the US. It was a small gathering yet again, but having all the people we love in the same room all at once was worth all the stress and frustration. I am not a huge fan of crowds, so while we could have invited three times as many people, I knew it wasn’t an option. Special thank yous go out to Singl-End Garnethill for hosting us, Angela & Billy for DJing, and Helen for the star-strewn cake. Having pals do their thing as part of our day felt very cool and apt.

Photo by Elaine A.

Photo by Elaine A.

Speaking of pals doing their thing, amazing knitters and crocheters from across the world came together to make us stars! I received a massive crate full of stars - all the sizes you can imagine - and made them into garlands which we hung in the evening venue. It was a perfect reminder that David and I are surrounded by creative, talented people with big hearts. Some of the makers were present and took great joy in finding their own stars; other makers simply wanted to gift us something wonderful. I thank you all. We are planning on turning all the stars into a beautiful wall hanging.

A few people have asked me why David and I decided to get married after being together since 2005. In recent years David and I have experienced some sad losses in our immediate family and also seen the world become a harsher place. We thought it was time to add some love and joy to the world — particularly for our families and close friends. This celebration was more than just David and I finally signing on the dotted line: it was a celebration of the people we love and cherish; the people we miss so much and forever will hold in our hearts. And that is what love does: it makes you see that the world is so much bigger than just you and yours; it opens up hearts and minds.

(Always choose love over hate, my friends. When you wake up in the morning, you have a choice what you want to put into the world, and I urge you to always choose kindness and love. You never know what your small acts of kindness and love will mean to people. )

David & Karina 210.JPG

Finally, some small tips for anybody who’s contemplating the whole marriage thing.

  • Avoid the massive wedding industry complex as much as possible. They will feed on your insecurities and make you feel inadequate no matter what. There are a myriad of ways of having a wedding, so stick to what feels right and true to you.

  • Getting married on a budget is more than possible. We didn’t have flowers (apart from two bouquets which I arranged myself), we didn’t hire an expensive photographer to document the day, we didn’t spend a huge amount on outfits (my fake fur coat was a wonderful vintage find, for instance), and I did my own makeup.

  • Don’t feel like you have to make everything yourself because you might be a maker. It is fine to delegate and get other people to do things they’re probably better at than you.

  • Don’t feel like you have to confine yourself to what a wedding should look like. You don’t need chair covers, favour bags, confetti, Mr & Mrs/Mrs & Mrs/Mr & Mr signage, or eight bridesmaids. My original dress plan was mustard yellow with fuchsia accents. Between the ceremony and the dinner, a bunch of us went to a downtown bar/art gallery where we had drinks and snacks while we dissected the state of the world.

David and I want to thank everybody who’s been in touch to offer their congratulations. It is so lovely to hear from you all and I hope that our mission to spread a bit of joy into the world has spread to you (even if just for a minute).

I shall return with knitting content very soon (because I have been knitting quite a bit).

Dear 2018, We Need To Talk.

winter.JPG

Dear 2018,

We need to talk about the year you have been. It’s been a memorable year full of highs and lows, full of challenges and successes. I will not forget you in a hurry.

I first met you in a small, local pub surrounded by friends singing. I remember the cold walk home and the sore throat the day after. You continued to be cold and frosty. I am not complaining — it makes for great knitwear occasions — but I would have preferred if you had kept the coldness and frostiness out of your attitude towards humankind. I hope for a better attitude from 2019: more acceptance, more love, and more understanding. Just saying.

Paradoxically what you did do well was throw a lot of good people my way. 2018 saw me making new friends and forging unexpected connections across the world. In a year as cold as you, conversations with new and old friends made a huge difference. I particularly remember one July morning when I was sitting on a balcony somewhere in the English Midlands. It was 5am and already too hot to sleep. And there I was, talking with a friend in California as the sun rose and I was getting ready to pack my suitcase yet again.

Because I was also travelling a lot this year and the personal connections made me able to cope with always being on the road.

Anna and Dan who let me into their home and we watched Gus van Sant films; Hattie who took me to a photo exhibition on 20th century avant-garde photography; Kirsten, Chris, Ziggie, and Oliver who sat me down for the most hipster pizza ever; Nathan who found my keys; Kate who always knew when I needed her company; Tina who found the beach; Allison who had so many brilliant ideas; and Gillian who drove me to a strange hotel — they were some of the many people who kept me sane.

DSC_0174.JPG

But you were an adventure, dear 2018. You were such an adventure. I saw so many wonderful, beautiful things and experienced places I never thought I’d see. The response to This Thing of Paper was something I could not have imagined — from the letters and postcards I received to reviews by people I have long admired to seeing the patterns spring to life in talented knitters’ hands. It was a labour of love, and a book that owes its existence to people everywhere as well as a truly amazing team of graphic designers, editors, and photographers. Seeing the book being nominated for awards felt huge.

Finding my design voice again after a long absence also felt huge.

betonbrut5.JPG

Béton Brut, Knowth, Vinterskov, and Hillhead were the only patterns I released this year. More are coming, I promise.

2018 was a year where designing did not come as easy to me as it has done in the past. Perfectionism was part of the conversation (like it is every year) but this year also saw me change the way I dress and present myself which fed into my designing. My design work is an extension of my own wardrobe, in a way, and I needed time to figure out how my change of style worked with my design practise.

(I rediscovered jeans this year. Revelation.)

Dear 2018. You did not make it easy for me, but I think I worked it out. Eventually.

But, don’t take this the wrong way, I’m looking forward to meeting 2019.

Love,

Karie

DSC_0878.JPG